Bypassing government censorship in Iran by deploying a Signal proxy using NGINX
You all know what recently happened in Iran and it is really devastating, the government of Iran has literally taken away the modern tools of power - “The internet” from citizens. Also government is censoring the internet traffic to help cut off the protests from getting noticed and tracking the internet users actively in oder to target them with the charges of violation later. End-to-end encrypted messaging applications have always posed a threat to government censorship and surveillance because end-to-end encrypted messages cannot be deciphered at any cost even by the company unless they have the user consent, so the government of Iran blocked signal last year itself, it wasn’t a concern until recently, because of the inhumane events that took place following the death of Mahsa Amini there was a need for ability to communicate securely like never before, this was impossible because the government had blocked any sort of communications with signal server. But signal recently made a call for help publicly to set-up proxies and help Iranians communicate with each other securely. I am writing this blog to explain how proxies work and how I set-up a proxy for Iranian citizens using the signal’s repository.
What is a proxy?
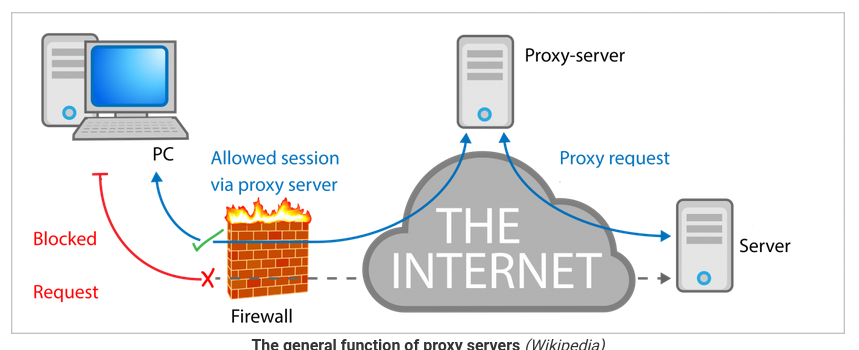
Proxy in plain english is “the authority to represent someone else”, in networking, proxy-servers are intermediate servers with different domain names / IP addresses you set-up to represent someone else’s server, whatever traffic comes to a proxy will be re-routed to the original server behind the scenes which you are representing without revealing any information to the outside world. For example say you live in country X and country X has blocked www.google.com but you want to access www.google.com at any cost, so you ask your friend living in country Y which has not blocked www.google.com to run a proxy server for you, let’s call that proxy as www.gproxy.com which is not blocked by country X, now you can make requests to www.google.com via www.gproxy.com, in simple words, instead of X <--> www.google.com which is blocked, we do X <--> www.gproxy.com (Y) <---> www.google.com. Proxies can also optionally encrypt traffic between itself and end-users by providing it’s own TLS certificates. Proxies are usually used to bypass firewalls by organizations or governments. Here is a figure I found on the internet that explains proxies better:
Signal’s TLS Proxy
Signal provided a TLS proxy in the following repository which spins up the proxy using docker-compose, the docker-compose file spins up two containers - NGINX container for terminating outer TLS connections from client and another one to relay inner TLS traffic to signal service endpoints. Let us understand how this exactly works:
Two layers of TLS encryption:
The goals of Signal TLS proxy are as follows:
- In a censored internet, the censors should not see what is in the packet traveling between client signal app and the proxy server, the packet should appear as if it is sent to just any other allowed server other than Signal.
- The person who runs the proxy server should not see what is in the packet, he just have to take the packet sent from the client and forward it to one of the targeted signal’s servers and send response back to the client without seeing what is actually in there.
This is how Signal TLS proxy achieves these goals (assume signal app as C, the proxy TLS terminator container as myproxy.com:tls, the relay container as myproxy.com:relay, api.signal.com as the signal’s endpoint, O represents the outer TLS encryption and I represents the inner encryption):
-
Assume that signal mobile client
Cwants to send dataDto TLS enabled signal serverapi.signal.com, it encrypts this data using TLS keys agreed withapi.signal.com- this is the inner layer of encryptionIand is the usual scenario whereCcommunicates directly withapi.signal.comwithout a proxy. Let’s call this encrypted data asI(D). -
Since signal app is configured to use proxy
myproxy.comwhich is also configured with TLS, the actual encrypted dataI(D)is also encrypted with the agreed TLS keys ofmyproxy.com, this adds one more layer of encryption:O(I(D))whereOis the outer layer of encryption. -
O(I(D))travels through the censored internet, sinceO(I(D))is encrypted, it is not possible for censors to understand what is inside it so the censors assume that the packet is traveling tomyproxy.comand allows it to pass through. -
The TLS terminator at the proxy
myproxy.com:tlsreceives the data, decrypts it to obtain the inner TLS dataI(D)which was supposed to be sent toapi.signal.com, not that the TLS terminator here will not be able to read the actual dataDbecause it is still encryptedI(D). -
Now the TLS terminator
myproxy.com:tlsforwardsI(D)“as is” tomyproxy.com:relaywhich relays it over toapi.signal.com.
Same happens in during the response phase as well, the encrypted TLS data I(D) from api.signal.com is encrypted by the proxy O(I(D)) and will be decrypted at the signal client. Thus Signal TLS proxy provides end-to-end secure TLS tunnel for people to communicate with signal servers from their phone app without having to worry about the sensors.
To summarize, the NGINX TLS terminator container runs on port 443 and hosts a TLS enabled HTTP server with certificates generated using let’s encrypt.
stream {

    upstream relay {
         server nginx-relay:4433;
    }

    server {
        listen                443 ssl;
        proxy_pass            relay;

        access_log            off;
        error_log             /dev/null;

        ssl_certificate /etc/letsencrypt/active/fullchain.pem;
        ssl_certificate_key /etc/letsencrypt/active/privkey.pem;
        include /etc/letsencrypt/options-ssl-nginx.conf;
        ssl_dhparam /etc/letsencrypt/ssl-dhparams.pem;
     }

}
It also hosts a HTTP server at port 80 to help TLS connection establishment (ACME challenge). As you can see, the upstream for this TLS terminator is configured as nginx-relay:4443 which is the second container that relays the data I(D) as is to signal servers. (Check full configuration here). The relay nginx configuration is as follows:
stream {
    map $ssl_preread_server_name $name {
        chat.signal.org                         signal-service;
        ud-chat.signal.org                      signal-service;
        textsecure-service.whispersystems.org   signal-service;
        storage.signal.org                      storage-service;
        cdn.signal.org                          signal-cdn;
        cdn2.signal.org                         signal-cdn2;
        api.directory.signal.org                directory;
        cdsi.signal.org                         cdsi;
        contentproxy.signal.org                 content-proxy;
        uptime.signal.org                       uptime;
        api.backup.signal.org                   backup;
        sfu.voip.signal.org                     sfu;
        updates.signal.org                      updates;
        updates2.signal.org                     updates2;
        default                                 deny;
    }

    upstream signal-service {
         server chat.signal.org:443;
    }

    upstream storage-service {
        server storage.signal.org:443;
    }

    upstream signal-cdn {
        server cdn.signal.org:443;
    }

    upstream signal-cdn2 {
        server cdn2.signal.org:443;
    }

    upstream directory {
        server api.directory.signal.org:443;
    }

    upstream cdsi {
        server cdsi.signal.org:443;
    }

    upstream content-proxy {
        server contentproxy.signal.org:443;
    }

    upstream backup {
        server api.backup.signal.org:443;
    }

    upstream sfu {
        server sfu.voip.signal.org:443;
    }

    upstream updates {
        server updates.signal.org:443;
    }

    upstream updates2 {
        server updates2.signal.org:443;
    }

    upstream deny {
        server 127.0.0.1:9;
    }

    server {
        listen                4433;
        proxy_pass            $name;
        ssl_preread           on;
        error_log             /dev/null;
        access_log            off;
     }
}
As you can see it contains the upstream definitions for many signal services that are needed for various functionalities of signal (Check full configuration here).
Hosting the proxy server:
The Signal TLS repository contains docker-compose file which can be executed to spin up the proxy in few seconds. Here are steps for installation:
-
Install Docker, Docker Compose, and git:
sudo apt update && sudo apt install docker docker-compose git -
Clone the Signal TLS Proxy repository:
git clone https://github.com/signalapp/Signal-TLS-Proxy.git -
Enter the repo directory:
cd Signal-TLS-Proxy -
Run the helper script that configures and provisions a TLS certificate from Let’s Encrypt:
sudo ./init-certificate.sh -
Use Docker Compose to launch the proxy:
sudo docker-compose up --detach
The proxy can be made available for use by sharing the proxy link as https://signal.tube/#<your_domain_name> where <your-domain-name> is the DNS domain name of your proxy (and the one you have used as hostname during generation of Let’s encrypt TLS certificates). signal.tube URL invocations on mobile invokes signal app and the app is registered to automatically configure the proxy as <your_domain_name> whenever it is invoked using signal.tube URL.